Wires and Cables
A Variety of Wires
Electra provides a variety of wires for every conceivable type of connections. Just drag and drop to place wires on your drawing. In addition, you can always customize wires, and drop them into your own custom stencils for further usage.

Difference Between A Line And A Wire
A normal line in Visio does not have data and intelligence as compared to a wire in Electra:
| Normal Visio Line | Electra wires | |
| Automatic Wire Status Display (turns red) | No | Yes |
| Automatic Wire Name Detection | No | Yes |
| Automatic Wire Name Propagation | No | Yes |
| Automatic Wire Connection | No | Yes |
| Location Information | No | Yes |
| Right click for Dots | No | Yes |
| Detected by Terminals | No | Yes |
Connecting and Manipulating Wires
Wires in Electra are extremely flexible and can be stretched and manipulated in a variety of ways, by dragging on their handles.
Editing Wire Name
To edit a wire name (2 methods):
- Click on a wire and type to edit.
- Double click on a wire or right click and select Edit Wire.
To show or hide wire name, right click on a wire and select Show or Hide Wire Name.
The Wire Window
Included on the Wire window are real time cross reference information on wires that you have already placed on your drawing. To display the location of a wire, click on a wire name. (e.g. /1.J1 - Page 1, location J1). To set the current wire name to a wire name that already existed in your drawing, double click on a wire name in the Existing Wire Names list, and click OK.
Customizing Wires
Users may want to customize existing wires, by changing line weights, color and to who wire names by default. To customize wires:
- Drop a wire onto a drawing.
- Customize wire accordingly.
- Drag and drop the customized wire onto your custom stencil.
- Drag and drop custom wire from stencil to drawing for further usage.
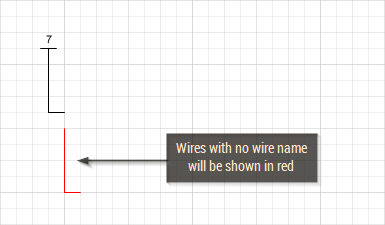
Automatic Wire Status Display
Wires in Electra will be automatically displayed in red when it does not have a wire name (orphaned). When a name is assigned, the wire will be displayed as black.
Automatic Wire Name Detection
When a wire is dragged and moved to connect to another wire, Electra will automatically detect and assign a wire name to the connected wire.

Wire Name Propagation
If you have multiple wires connected together, changing the name of any wire will also changes the names for all connected wires. Changes will propagate to all connected wires, through wire links and even over multiple pages.
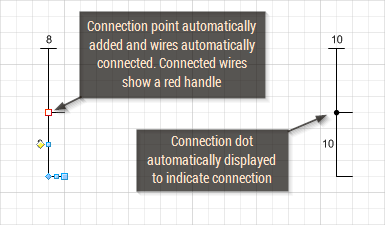
Automatic Wire Connection
When a wire is connected to another wire, Electra automatically creates a connection point and connects the 2 wires together. Wires that are connected, will display a red handle. When you move the wire away, the connection point is automatically deleted.
Wire Links
Wire links are used to extend a wire to another location, on the same page or to another page, while still symbolically representing a single wire. Use FromWireLink (source) to extend a wire to another location and ToWireLink (target) to continue a wire from another location. When you double click on unpaired links, Electra will automatically prompt you to pair them. When double clicking on paired links, Electra will automatically jump to the target link.
Assigning Cables
To assign a cable to a wire:
- Right click on a wire and select Edit Wire.
- On the Wire Window, click on Cable button.
Managing Cables
To assign and manage all cables:
- Click on menu Electra | Manage Cables.
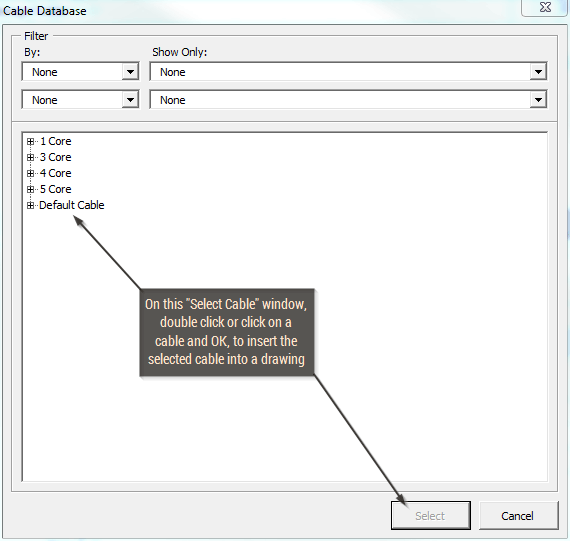
Selecting A Cable
When users click the "Select" button on the Manage Cables window, the Select Cable window will be displayed. Click on a cable and then click OK to select the cable to be used on the wire.
Arranging Cable Cores
When users click the "Arrange" button on the Manage Cables window, the Arrange Cable Core window will be displayed. Drag wires from any core and drop to any other core to rearrange cores. Alternatively, drag wires to the right to remove wire from a core, or to drag it back to another core.

The Cable Database
The Cable database stores all cable specifications so that they can be used and re-used on multiple projects and drawings. Once a cable is selected, it's specifications is then transferred and stored on the drawing itself for portability.
To access the cable database:
- Click on menu Electra | Cable Database.

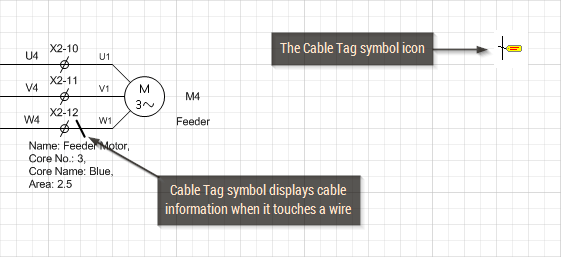
The Cable Tag Symbol
The Cable Tag symbol is used on a drawing to automatically display cable information on a wire. Simply drag and drop the Cable Tag symbol on any wire to display cable information. More options are available with a simple right click.