

Getting Started
Starting Electra
To start a new Electra drawing:
- Click on the Windows Start button.
- Select Programs | Radica Software | New Electra Drawing.
When Electra is loaded into Visio, users will see an "Electra" tab on Visio's menu. For older versions of Visio prior to Visio 2010, users will see a menu instead. To use Electra for electrical drawings, you must create a new drawing using the New Electra Drawing template, or a template that is created from this template. For all other non electrical drawings, usage of this template is not required.

To open an existing Electra drawing:
- Double click on the drawing file (.vsd or .vsdm) and Visio will automatically load Electra.
Saving Electra Drawings
Electra drawings contains codes and data that perform all the automation, therefore when you save a drawing, ensure that you are saving into ".vsd" (Visio 2010 or older) or ".vsdm" (Visio 2013 or Visio 2016) formats.
Page Scale
In Visio, each and every page can be set to different scales. On the New Electra Drawing template, the page is set to 1:1 scale, which is optimized for schematic drawings and produces an excellent printed copy. During panel layout, you may need to apply a different scale. For medium sized panels, we recommend a scale of 1:5 and for bigger panels a scale of 1:10.
To set page scale:
- Right click on the page tab, then select Page Setup.
- Click on the Drawing Scale tab.
- Click Pre-defined scale or Custom scale.
- Enter your desired scaling.

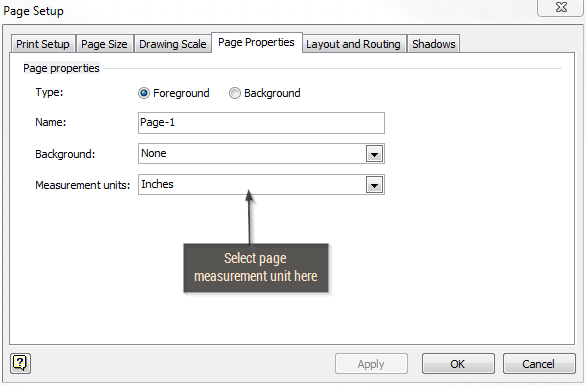
Page Measurement Units
Each and every page can also have its own measurement units, where rulers and grids on a page will change to reflect the new measurement units. On the New Electra Drawing template, page measurement units are set to inches and is optimized for schematic drawings. During panel layout, you may need to apply a different measurement unit. For panel layout drawings, a measurement unit of millimeters is recommended.
To set the measurement units:
- Right click on the page tab, then select Page Setup.
- Click on the Page Properties tab.
- Click and select the desired measurement units.
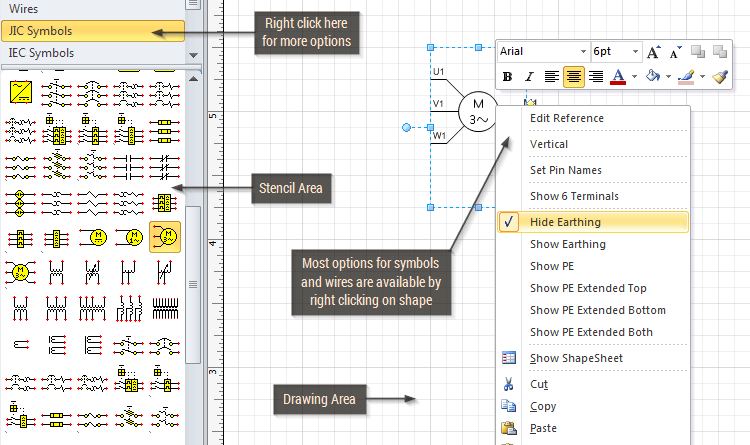
Stencils and Drawing Area
On the left of the Visio screen are a list of stencils, which contains a collection of symbols that you can drag and drop onto your drawings. The shapes on a stencil are called Master shapes or Masters. All stencils can be configured to display symbols in multiple ways, so please right click and explore display options.
Users can create their own custom stencils and masters and once a master is dragged from a stencil to a drawing, Visio automatically creates a copy of the master in your drawing for portability. This allows users to send drawings to customers, vendors and colleagues without any loss of information. They will be able to use and modify your drawings even though they might not have your custom stencils and Electra installed (without intelligence and productivity tools).
Connection Points
Most shapes in Electra have connections points to allow one shape to connect to another (e.g. connecting a wire to a symbol). Although they are visible in the drawing, they are not printable, meaning they will not appear on the printed hard copy (In Visio 2010 and above, they are dynamically hidden and shown, as you drag a wire near a symbol).

To add connection points:
- Click on a shape.
- Click on the connection point tool.
- Press CTRL key and click on anywhere you would like to add a connection point.
To change the position of a connection point:
- Click on a shape.
- Click on the connection point tool.
- Click and drag a connection point from the shape to a new position.
To delete a connection point:
- Click on a shape.
- Click on the connection point tool.
- Click on a connection point.
- Press the DEL key.

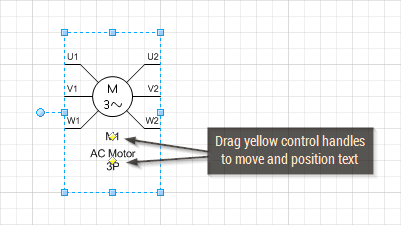
Positioning Text
Symbols and wires in Electra have yellow control handles that let users re-position text easily. Simply drag on yellow control handles to move them to a new position.
Selecting Sub Shapes in a Group
Individual shapes in a group (sub shapes) can be individually selected and formatted. Click on a group, then click on the sub shape (not double click). Applying formats (e.g. font, alignment) to the group will affect all shapes in the group while applying formats to a sub shape will only affect the individual sub shape.
