Intelligent Terminals
Terminal Status Detection
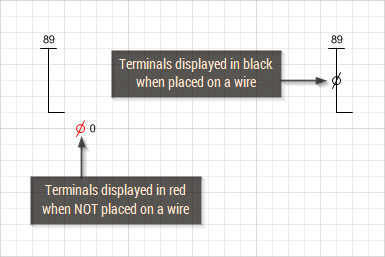
Terminal symbols are always placed on wires. In Electra, the terminal symbol will be displayed as red when it is not placed on a wire. When placed on a wire, it will automatically detect the underlying wire and will be displayed as black.
Automatic Wire Splitting
When a terminal is placed on a wire, Electra automatically splits the wire into two parts, but still preserving cable data. For example, if a wire is assigned to a cable and splitted by a terminal, Electra will insert the same cable onto the drawing and assign it to the splitted wire. When splitted wires are too short to display wire names, Electra will automatically hide wire names for improved viewing.
Using and Generating Terminals
To use terminals:
- Drop terminal symbols on wires.
- Drop terminal list symbol, right click and select generate to generate terminal listing.
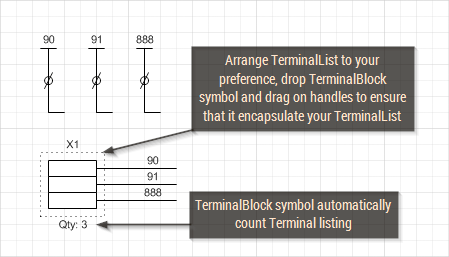
- Arrange terminal listings, then drop a terminal block symbol to encapsulate terminal listings.
- Right click on the terminal block and select Edit Terminal Block or Renumber.
Generated terminal listing will automatically update wire names when they are changed on a wire. Generated terminal number will automatically update on terminal symbols (when terminal with numbers is used). If there are any modifications of terminal symbols after generating terminal listings, right click on any TerminalList symbol and generate again. Electra will automatically synchronize (create or remove) TerminalList symbol based on your modifications.
To insert manual terminal listing, simply drop a TerminalList symbol or duplicate from another. Manually inserted terminal listings will be preserved by Electra, while automatically generated terminal listings will be automatically created or removed by Electra during terminal listing generation.
Manually Assigning Terminal Numbers
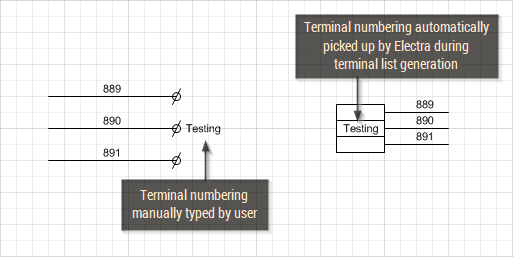
If you wanted to manually assign terminal numbers, simply click on any terminal symbol and type away. For example, you can click on any terminal symbol and type in "X1-3". These terminal numbers will be automatically picked up by Electra when generating Terminal listing.
Alternatively users can right click on a TerminalBlock symbol to select Renumber Terminals and Electra will automatically assign terminal numbers and update them on both terminal symbols and terminal listings. Automatically generated terminal numbering will always overwrite manually assigned terminal numbers.
Jumping to Linked Terminals
Double click or right click on any terminal listing to jump to the terminal symbol. On the terminal symbol, double click or right click again to jump back to the terminal listing. During jumping, the target terminal symbol or terminal listing will always be selected for easy viewing.
Using Terminal Blocks
Terminals are normally handled as blocks. Users may have one row of higher rated terminals and other rows of lower rated terminals. Electra enables a mix of terminals by using the TerminalBlock symbol. To use the TerminalBlock symbol:
- Drag a TerminalBlock symbol onto your drawing.
- Drag and resize the TerminalBlock symbol and ensure that it encapsulate all your terminal listings.
- Right click and select ReNumber Terminals to generate TerminalBlock with numbers.
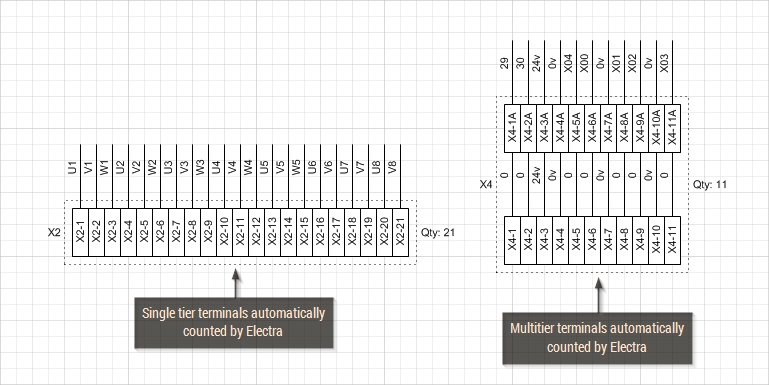
TerminalBlock symbols automatically calculate the amount of TerminalList symbols that it encapsulates. When TerminalList symbols are added onto a drawing, click on the TerminalBlock symbol, drag and resize TerminalBlock symbol to encapsulate all TerminalList again, and Electra will automatically re-calculate TerminalList symbols. Alternatively, to manually re-calculate, right click on the TerminalBlock symbol and select Count Terminals.
The TerminalBlock symbol is also used during panel layout to generate a terminal block component. To edit the TerminalBlock reference, right click and select Edit Terminal Block:
| Fields | Default Value | Description |
| Terminal Reference | X1 | Used as a reference to identify a terminal block. |
| Terminal Width | 10 mm. | The width of each terminal in the block. Accepts major units (e.g. mm, in, cm) |
| Terminal Height | 50 mm. | The height of each terminal in the block. Accepts major units (e.g. mm, in, cm) |
| Reference position | Left | Other values: Right, Top, Bottom. Select the reference text position. |
| Quantity position | Right | Other values: Left, Top Bottom. Select the quantity text position. |
When you drag a TerminalBlock symbol from a stencil, the symbol will be populated with default values. When you duplicate a TerminalBlock symbol from an existing one, it will inherit all the properties from the symbol that it is copied from. For example, you may use terminals that are 15mm wide. Drag a TerminalBlock symbol from the stencil, set the width property to 15mm, duplicate 3 more TerminalBlock symbols and all of them will inherit the properties and have the Terminal Width property set at 15mm. Alternatively, TerminalBlock properties can also be accessed by using the Generate Layout or Manage Component window.
Organizing Multitier Terminals
Some terminals may have just 2 connections while others may have 4 or more connections, and we called these terminals, multitier terminals. To enable Electra to identify terminals with more than 2 connections, simply arrange them in parallel, either horizontally or vertically.
Ensure that the TerminalBlock symbol encapsulates all terminals and Electra will be able to identify and count them properly. Once counted, Electra would be able to generate BOM and layout accordingly.